Sometimes your team needs something today or tomorrow. Such a short timeline doesn’t allow for rigorous discovery research with users, weeks to explore the problem space, and endless ideation on concepts. This is when you need to find the shortest path between points A and B with a robust solution. And in reality every situation is going to be different, however this is how I approached such a situation over the course of two days:
UNDERSTAND THE PROBLEM
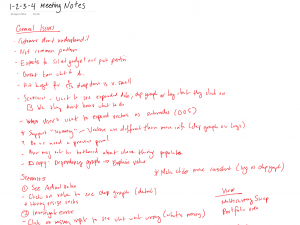
I didn’t have access to the end users who reported the problem, so I met with the team members who observed them (and initiated the request) to understand:
- What was the observed problem and why was it a problem?
- Where was the problem occurring?
- Who were the users having the problem?
- What were they trying to do? Could they give an example of a scenario?
- How frequent was the problem occurring?
- What was the result or effect of the problem?
- Did they have any suggestions on how to fix the problem? (This question never needs to be asked. It’s freely given.)
With that information, I went on to understand the problem better by replicating the problem, replaying the scenarios while referencing the relevant personas and their design maps. I was looking for related needs and to contextualize this problem in relation to their tasks and goals. I then went to speak to the folks who originally implemented the solution to understand why they did it the way they did. While I had them, I requested from them all the affected UI and data types to better understand the impact of the problem across the system. I also looked at the feasibility of what they were asking for to make sure I could deliver in the time provided.
CLARIFY PROBLEM, SCOPE & OBJECTIVES
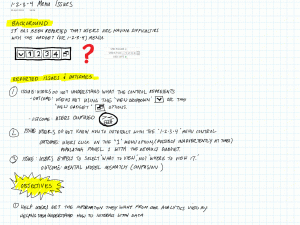
Now with a bit more of an understanding of the problem, I went to clearly express it as an objective (thinking about success criteria) and its associated scenarios. I also created a list of possible scope candidates and approaches to solutions. I reviewed everything with my stakeholders and unearthed a ‘must-have’ requirement that could have sabotaged any solutions without it. With an agreement on the problem, objective and scope, I proceeded.
CREATE PRINCIPLES AND GENERATE IDEAS
I then distilled down all the information in my head, empathizing with my (assumed) users and what they were trying to do. Based on that, I started to form principles and assumptions to help guide the flow of ideas. Next, I started to generate ideas – lots of them. First on task flow and then on supporting UI elements. Ideas that seem good, obviously warranted further exploration. Bad ones reminded me that I was getting off track and told me what not to do. As stronger ideas emerged, I started to validate them with what was close by: your scenarios, personas (somewhat) and the people around me, particularly the UI Engineers for feasibility.
PRESENT THE DESIGN

As the ideas became stronger, I took the best candidates, fleshed them out a bit and then took them to my stakeholders, along with my approach to get to them. I presented the options, taking them through the interactive flow in the shoes of the end users we agreed upon, calling out principles and assumptions that were driving the solution. I also went back to the original problems reported by the end-users to see if their problems would be solved by the solution.
The Lead UI Engineer flagged up an interaction concern, which I agreed on, and we quickly brainstormed out a better solution then and there. With no other major concerns from the stakeholders and agreement on the direction and rationale, I proceeded to visual design.
ITERATE THROUGH VISUAL DESIGN & DEVELOPMENT
I had a quick conversation with the Lead UI Engineer about whether or not it was necessary to interactively prototype the feature, and we agreed that we could work together to build it in code instead. I would, of course, still need to create the image assets and proceeded to do so.
In working with the UI Engineer to create the ‘living’ prototype, we uncovered more interaction issues and gaps in the sketches and comps. Together, we solved them iteratively, making changes across the solution when needed to keep it consistent. With the prototype UAT’d by me and my stakeholders, it was ready to be committed to go into the next release.
MEASURE
An important part of design, is the ability to measure one’s work. I would look towards product metrics or usability testing to validate the solution, however as I didn’t have access to the end users, I instead created a short discussion guide that our Sales/Implementation team could use to inquire about the new menu in the course of interacting with the customer normally:
- Were end-users able to execute their tasks accurately and in a timely manner?
- Did they notice the change and see it as an improvement?
- Was the new control and icons discoverable and clear in their function?
- Was the new control providing the appropriate affordances and feedback?
- Was the size and placement of the new gadget acceptable?
After collecting the information, we would convene to discuss the findings, and based on them decide how to continue improving the solution.
IN CLOSING
Working on problems with compressed timelines can be challenging, however by following a few guidelines, I think it can be done sucessfully:
- Gaining as clear understanding of the problem as quickly as possible
- Communicating frequently with your stakeholders
- Quickly generating and iterating on your ideas
- Creating a plan to measure the success (or failure) of the solution
Besides, a little pressure, I find, is a good thing.